


Whiteout Survival Gear Guide: Material Costs & Upgrade Order

2026-07-10 17:52:58

In the frozen wasteland of Whiteout Survival, your colony’s survival and your alliance’s dominance depend heavily on one thing: your Gear Power. Whether you want to dominate the Sunfire Castle or maximize your damage in the Bear Hunt event, understanding how to optimize your Chief Gear and Hero Gear is crucial.
This ultimate Whiteout Survival gear guide will break down the golden upgrade order, exact material costs, and how to get resources fast without wasting precious items.
Need Gems fast? Top up your Whiteout Survival currency at TOPUPlive for safe delivery with no hidden fees.
▍Chief Gear Guide: The Golden Upgrade Order
Chief Gear becomes available once your Furnace reaches Level 22. It provides powerful global buffs to your entire army (Infantry, Marksmen, and Lancers).
However, upgrading randomly is a major mistake. You must follow a strict priority order based on troop roles:
- Chief Gear Pieces (Defense/Health Focus): Infantry ➔ Marksmen ➔ Lancers
- Why? Infantry is your frontline. If your Infantry dies too fast, your backline (Marksmen) will get wiped instantly. Always upgrade your Infantry boots and armor first.
- Chief Charms (Lethality/Attack Focus): Marksmen ➔ Infantry ➔ Lancers
- Why? Charms boost Lethality. Marksmen are your primary damage dealers. Maxing out Marksman Charms first ensures you melt enemy lines.
Pro Tip: Always upgrade your gear in sets! Whiteout Survival rewards Set Bonuses (3-piece and 6-piece milestones) that grant massive percentage boosts to Attack and Defense. Keep your gear levels balanced across all slots.
▍Chief Gear Upgrade Costs (Green to Mythic)
To help you plan your progression, here is the exact amount of Hardened Alloy and Polishing Solution required to upgrade a single piece of Chief Gear through the early and mid-game stages:
Gear Quality / Tier | Hardened Alloy Required | Polishing Solution Required |
|---|---|---|
Green ➔ Blue (Rare) | ~1,200 | 0 |
Blue ➔ Purple (Epic) | ~4,800 | ~240 |
Purple ➔ Orange (Mythic) | ~18,500 | ~1,100 |
Orange T1 Upgrade | ~35,000 | ~2,500 |
How to Farm Chief Gear Materials Fast
Farming these materials takes time. Make sure you fully participate in these events:
- Crazy Joe Event: The absolute best source for Hardened Alloy.
- Canyon Clash & Foundry Battle: Exchange your event tokens in the shop for Polishing Solutions.
- The Intelligence Station: Complete your daily Intel missions for a steady, passive income of lower-tier alloy materials.
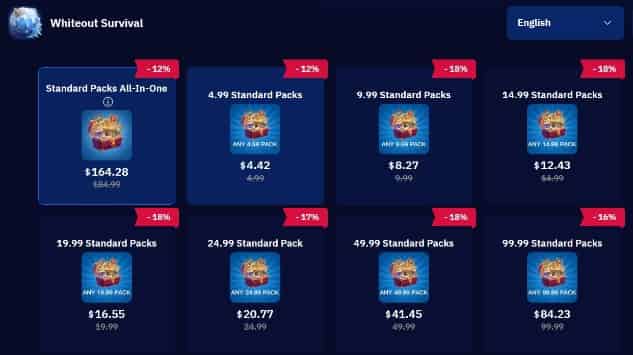
If you want to speed up your progression and unlock these tiers faster, you can check out the cheap Whiteout Survival Top Up deals to get frost stars and upgrade packs instantly.
▍Whiteout Survival Hero Gear Mastery

While Chief Gear buffs your entire account, Hero Gear enhances individual heroes and their specific troop leadership skills. Hero gear is divided into three tiers: Blue (Rare), Purple (Epic), and Orange/Gold (Mythic).
Best Hero Gear Strategy for F2P & Low Spenders
- Dismantle with Zero Penalty: Don’t be afraid to upgrade Blue or Purple gear early on. You can use old, upgraded gear as EXP material to level up your new Epic or Mythic gear later. You do not lose any EXP in this process.
- Focus on the "Big Three": Allocate your best Mythic gear to your Arena and Rally leaders (e.g., Flint, Alonso, or Molly).
- Match the Gear Symbol: Ensure the gear matches the Hero’s troop type (Infantry gear on Infantry heroes) to activate the hidden stats bonus.
For more character-specific builds, read our comprehensive Whiteout Survival Hero Guide to see which heroes deserve your best mythic gear first.
▍How to Unlock Mythic (Orange) T1 and T2 Gear
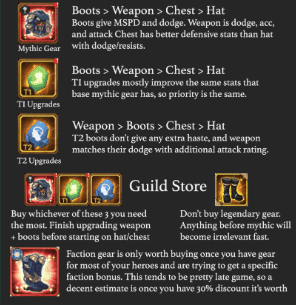
As your server ages (usually after Gen 2 or Gen 3 heroes drop), you will unlock the ability to upgrade your Orange Hero Gear into Mythic T1 and T2 variants using Moonstones and Lunar Ember.
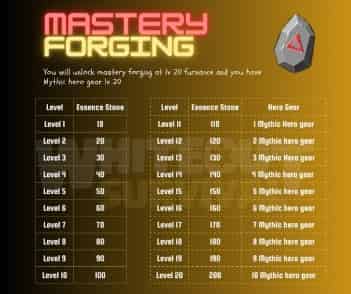
- Prioritize Mastery Levels: Once your Hero Gear reaches Level 20, you can use Mastery Stones to increase its Mastery level. Focus on boosting the Mastery of your Infantry Gear (for Health) and Marksman Gear (for Attack) first.
- Where to get Lunar Ember & Moonstones? These rare endgame materials are found in the Tundra Trading Station, King of Icefield events, and VIP daily packs.
▍FAQs About Whiteout Survival Gear
1. Which Hero Gear should I upgrade first?
Upgrade Gloves and Belt first for Infantry heroes to boost Health and Defense. For Marksmen and Lancers, prioritize Goggles and Boots to increase Lethality and Attack.
2. Should I upgrade Chief Gear evenly?
Yes, always upgrade Chief Gear evenly. This unlocks crucial Set Bonuses at 3 and 6 pieces, providing the best squad-wide attack and defense buffs.
3. How do F2P players get Mythic Hero Gear?
Buy Mythic Shards weekly from the Arena Shop. Also, actively participate in events like Crazy Joe and Frostfire Mine to farm upgrade materials.
4. How do I get Legendary (Red) Hero Gear?
Bring your Mythic gear to Level 100 and Forging Level 10. Then, consume 2 identical Mythic gear pieces to upgrade it to Legendary quality.
5. Who should get Hero-Specific Widgets?
Save Widgets exclusively for top-tier, latest-generation heroes. Do not waste these rare resources on temporary or low-tier epic heroes.
▍Conclusion
Mastering your gear progression is the ultimate secret to surviving and thriving in Whiteout Survival. By strictly following the correct upgrade order—prioritizing Infantry for Chief Gear defense and Marksmen for Charm lethality—you can maximize your combat power without wasting precious resources. Keep your gear levels balanced to secure those massive set bonuses, and always recycle your lower-tier hero gear to level up your mythic pieces at zero cost.
Get safe, instant, discounted top-ups with 12% off all games ( for user users) or 10% off using blog code: topupliveblog. Save now!
>>Buy Whiteout Survival Aurion<<

Bob Black
game writer
I’m a gaming writer who enjoys breaking down complex game systems into clear, easy-to-understand guides. I like exploring new updates, analyzing mechanics, and turning complicated information into practical tips that players can actually use.


Related News

Infinite Borders Top Up Guide: How to Recharge Jade Safely & Cheaply
How to Play Argent Flow: Kit, Teams, and Gameplay Guide
Zenless Zone Zero 3.3–3.5 Banner Leak: Clarret, Roxy, Searian and Phoenix Release Predictions
Foundation Galactic Frontier Spending Guide: Best Platinum Credits Uses
Honkai: Star Rail 4.7 to 5.4 Banner Leaks: Aeon ★ Aha, Firefly SP, Kafka SP & Full Roadmap
Arknights: Endfield 'Echoes of War – Season of Phantasia' Guide: Schedule, Stages Rewards and Best Teams
Wuthering Wave Banner 2026 Schedule & History – Current, Next & Past Banners
Wuthering Waves Lunites Fully Explained: What It Is, Usage, Prices and More